参考https://blog.csdn.net/solaraceboy/article/details/78743563
以下机器都是centOS 7
1 需要Linux安装nfs-utils。所有机器都需要装。
yum -yinstall nfs-utils2 启动服务端的nfs和rpcbind服务,并将其设置为开机启动(作为服务器,应保证服务在每次重启之后都能迅速提供服务)。
systemctl start nfs systemctlenable nfs systemctl status nfs systemctl start rpcbind systemctlenable rpcbind systemctl status rpcbind或者
systemctlenable nfs --now systemctlenable rpcbind --now或者更简单一点:
systemctl enable nfs-server --now(base)[root@localhost ~]# systemctl start nfs(base)[root@localhost ~]# systemctl enable nfs Created symlink from /etc/systemd/system/multi-user.target.wants/nfs-server.service to /usr/lib/systemd/system/nfs-server.service.(base)[root@localhost ~]# systemctl status nfs ● nfs-server.service - NFS server and services Loaded: loaded(/usr/lib/systemd/system/nfs-server.service; enabled; vendor preset: disabled) Active: active(exited) since 四2021-12-0221:26:17 CST; 24s ago Main PID:2792(code=exited,status=0/SUCCESS) CGroup: /system.slice/nfs-server.service12月 0221:26:17 localhost.localdomain systemd[1]: Starting NFS server and services...12月 0221:26:17 localhost.localdomain systemd[1]: Started NFS server and services.(base)[root@localhost ~]# systemctl start rpcbind(base)[root@localhost ~]# systemctl enable rpcbind(base)[root@localhost ~]# systemctl status rpcbind ● rpcbind.service - RPCbindservice Loaded: loaded(/usr/lib/systemd/system/rpcbind.service; enabled; vendor preset: enabled) Active: active(running) since 四2021-12-0221:26:17 CST; 46s ago Main PID:2788(rpcbind) CGroup: /system.slice/rpcbind.service └─2788 /sbin/rpcbind -w12月 0221:26:17 localhost.localdomain systemd[1]: Starting RPCbind service...12月 0221:26:17 localhost.localdomain systemd[1]: Started RPCbind service.3、在服务端创建共享目录。
mkdir /nfskevin4、修改服务端配置文件
修改服务端配置文件vim /etc/exports,增加如下一行:
(1) * 任意主机可以使用NFS服务
(2) rw 该主机对该共享目录有读写权限
(3) async 资料会先暂存于内存中,而非直接写入硬盘
(4) no_root_squash 登入 NFS 主机使用分享目录的使用者,如果是 root 的话,那么对于这个分享的目录来说,他就具有 root 的权限,单词squash是压缩压扁的意思。
(5) Root_squash 在登入 NFS 主机使用分享之目录的使用者如果是 root 时,那么这个使用者的权限将被压缩成为匿名使用者,通常他的 UID 与 GID 都会变成 nobody 那个系统账号的身份。
声明三个事情:分享什么文件、给哪个IP分享、权限是什么。ro是read only,rw是read write。
/nfskevin10.10.14.38/24(ro)要开读写权限注意文件的权限需要改,而不是像下图只有读:
5、重启服务端nfs服务
systemctl restart nfs-server或者
exportfs -r6、配置服务端防火墙
firewall-cmd --add-service=nfs --permanent firewall-cmd --reload7、启动客户端nfs服务(客户端可以不启动rpcbind服务),挂载服务端nfs目录。
systemctlenable nfs --now systemctlenable rpcbind --nowmkdir /mntkevinmount -t nfs10.10.14.36:/nfskevin /mntkevin8、测试。
在客户端查看一下挂载情况。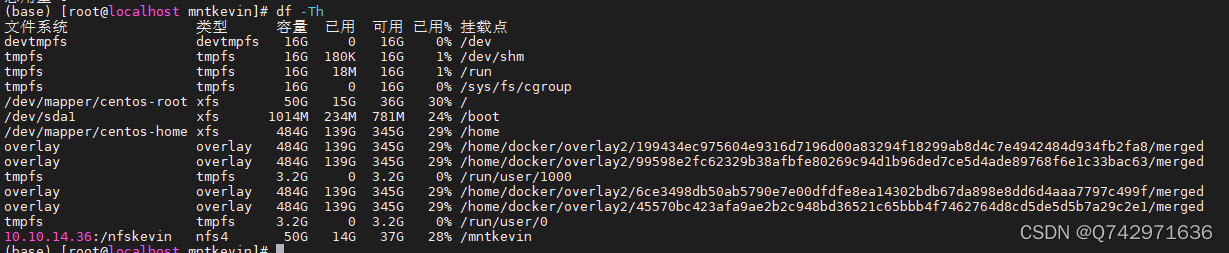
9、客户端的挂载,让开机就可用,开机就挂载起来。
vim /etc/fstab写:
10.10.14.36:/nfskevin /mntkevin nfs defaults00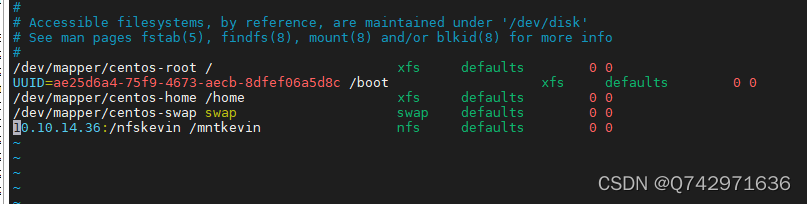
mount -a# 将/etc/fstab的所有内容重新加载 mount -a 会忽略所有已经完成的操作,也就是开机时 fstab 已经挂载后,而且你没有修改 fstab 。你再运行 mount -a ,他会自动忽略全部 fstab 内容。